PEER CRITIQUE QUESTIONS:
1. How is the artist's composition? Could anything be added to enhance the overall image?
2. How is the work's value: Is the value accurate and focusing on realism?
3. Is the mark making (dots) clean, concise and meditative?
4. Is there an unnecessary outline to the drawing?
5. Are the dots equally spaced to ensure correct value?
"Those who do not want to imitate anything, produce nothing."
-Salvador Dali
this is a very meditative way to make something awesome! It takes a long time, but the results are beautiful.
Learning Objectives/ STEPS:
Students will-
Terms:
Stippling (verb): (in drawing and painting) marking a surface with numerous small dots or specks
Pointillism: It was primarily invented by painters George Seurat and Paul Signac. While Impressionists used small dabs of paint as part of their technique, Pointillism took this to the next level using only small dots of pure color to compose an entire painting.
Gridding: laying a gridded pattern to ease the study of replication
Value: the degree of lightness or darkness in a color
Observational Drawing: develops parts of the brain that helps us see better
*builds confidence
*requires intense concentration
History:
- Became popular in reproducing publications for they could be reproduced easily in black ink)
- used in botanical/medical drawings
- used in the Wall Street Journal
Constraints:
-8” x 11” drawing paper
-8” x 11” high contrast photo OF SOMETHING UP CLOSE
-HB pencil
-eraser
-black micropen pen ( or any black, inky pen that leaves a concise, clean mark)
-ruler
Steps:
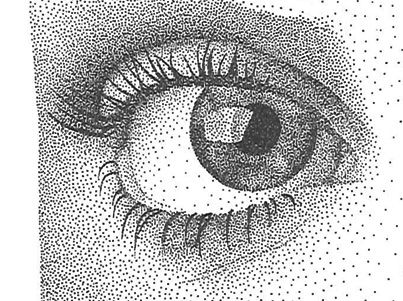
1. print out a black and white photo of something up close (no landscapes, examples below)
2. grid photo + drawing paper EQUALLY
3. sketch image accordingly on drawing paper. Remember, draw LIGHT AND NO SHADING (you will erase pencil eventually)
4. once pencil drawing is accurate, begin stippling THE LIGHTEST AREA FIRST (spaced dots)
Q & A
Margeaux asked a very good question! "Why do you have to start with the lightest area first?" Because, let's say you start with the darkest area (in other words, the most time consuming # of dots) you will then have to dot accordingly (value wise) for the rest of the mark making. Does that make sense? So, if you start with the lighter areas it will be easier to add more, rather than not being able to take away dots. That being said, if you'd like to start with the dark, there is no harm, you just will have to keep consistency with that darkest dark, ya know?
Tips from the teacher:
CAS (Visual Arts)-Lesson Goals-State Standards
Standard 1: Observe and Learn to Comprehend
*Use the visual arts to express, communicate, and make meaning. To perceive art involves studying art; scrutinizing and examining art; recognizing, noticing, and seeing art; distinguishing art forms and subtleties; identifying and detecting art; becoming skilled in and gaining knowledge of art; grasping and realizing art; figuring out art; and sensing and feeling art.
1.1: Visual Art has inherent characteristics and expressive features
1.3: Art and design have purpose and function
-Salvador Dali
this is a very meditative way to make something awesome! It takes a long time, but the results are beautiful.
Learning Objectives/ STEPS:
Students will-
- Use close observation to understand objective reality
- Learn and produce the art of stippling
- Strengthen drawing skills
- Apply new vocabulary to their art
- Practice patience!
- Practice slow, meditative, meticulous markings
Terms:
Stippling (verb): (in drawing and painting) marking a surface with numerous small dots or specks
Pointillism: It was primarily invented by painters George Seurat and Paul Signac. While Impressionists used small dabs of paint as part of their technique, Pointillism took this to the next level using only small dots of pure color to compose an entire painting.
Gridding: laying a gridded pattern to ease the study of replication
Value: the degree of lightness or darkness in a color
Observational Drawing: develops parts of the brain that helps us see better
*builds confidence
*requires intense concentration
History:
- Became popular in reproducing publications for they could be reproduced easily in black ink)
- used in botanical/medical drawings
- used in the Wall Street Journal
Constraints:
-8” x 11” drawing paper
-8” x 11” high contrast photo OF SOMETHING UP CLOSE
-HB pencil
-eraser
-black micropen pen ( or any black, inky pen that leaves a concise, clean mark)
-ruler
Steps:
1. print out a black and white photo of something up close (no landscapes, examples below)
2. grid photo + drawing paper EQUALLY
3. sketch image accordingly on drawing paper. Remember, draw LIGHT AND NO SHADING (you will erase pencil eventually)
4. once pencil drawing is accurate, begin stippling THE LIGHTEST AREA FIRST (spaced dots)
Q & A
Margeaux asked a very good question! "Why do you have to start with the lightest area first?" Because, let's say you start with the darkest area (in other words, the most time consuming # of dots) you will then have to dot accordingly (value wise) for the rest of the mark making. Does that make sense? So, if you start with the lighter areas it will be easier to add more, rather than not being able to take away dots. That being said, if you'd like to start with the dark, there is no harm, you just will have to keep consistency with that darkest dark, ya know?
Tips from the teacher:
- Practice SLOW, FOCUSED, CAREFUL observations
- When gridding paper, there must be equal measurements on each paper
- Draw what you see, not what you ‘think’ you see
- Lightly sketch with pencil/no shading
- "Measure twice, cut once" mentality
- Make DELIBERATE markings, EACH dot should be clean, not a dash
- DON'T RUSH!
- Start light --> dark
CAS (Visual Arts)-Lesson Goals-State Standards
Standard 1: Observe and Learn to Comprehend
*Use the visual arts to express, communicate, and make meaning. To perceive art involves studying art; scrutinizing and examining art; recognizing, noticing, and seeing art; distinguishing art forms and subtleties; identifying and detecting art; becoming skilled in and gaining knowledge of art; grasping and realizing art; figuring out art; and sensing and feeling art.
1.1: Visual Art has inherent characteristics and expressive features
1.3: Art and design have purpose and function
watch video below for stippling time lapse!
do you see how clean and concise his stippling mark making is????
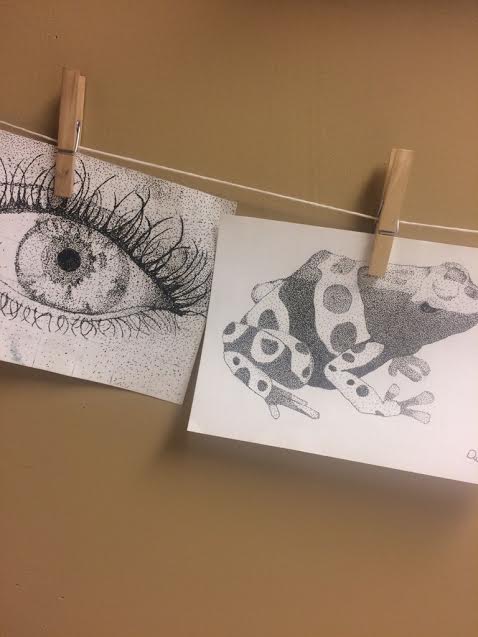
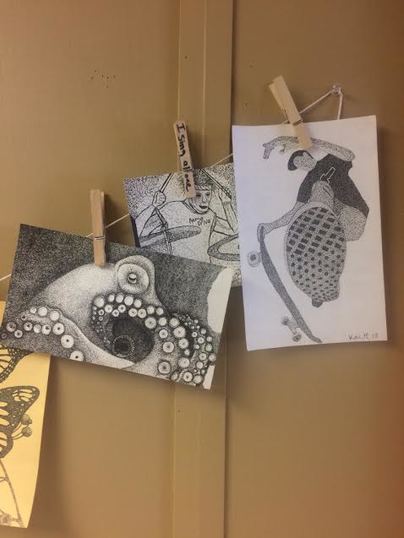
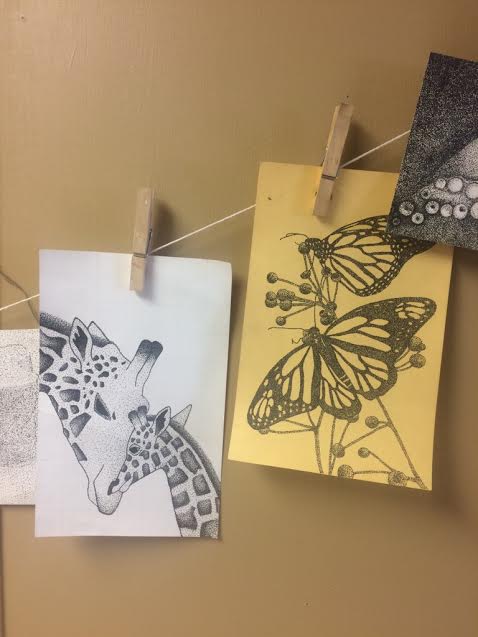
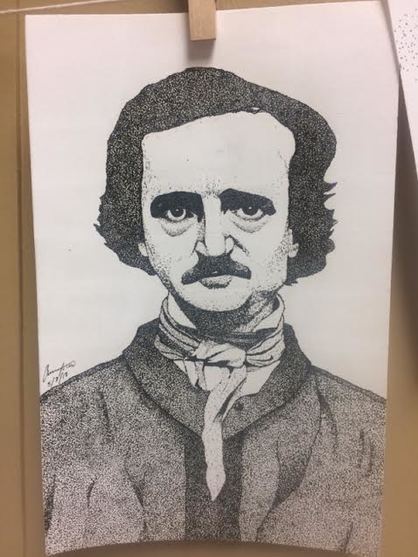
Class examples from 2018
|

|
|
|
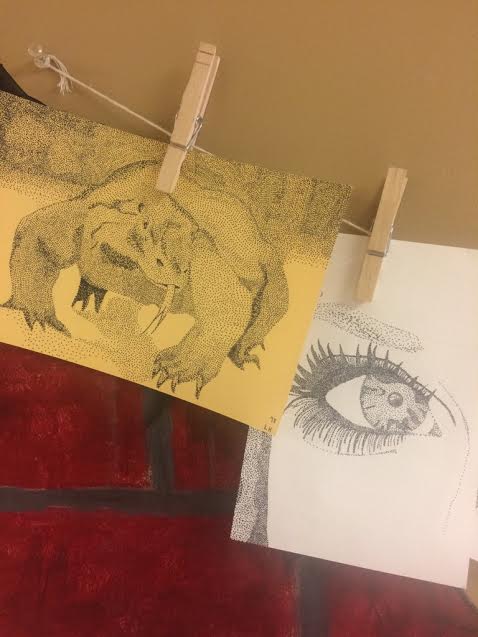
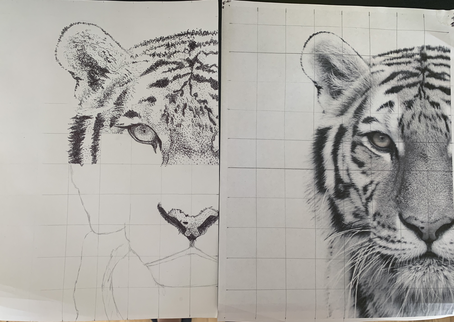
do you see how up close and high contrast images work better? ( i.e the eyes, animals, just portraits etc.), pick something that interests you for the long haul...you will be looking at it for quite a while. SLOW AND STEADY WINS THE RACE.
GRIDDING
we've done this in class before...you can keep it simple, like I do, or go as deep into math as you would like! Whatever works.
|
|
1. you want several, equal boxes when gridding your image.
2. always grid your IMAGE FIRST
3. now grid your paper with the same measurements/ amount of boxes as your paper has ** atleast 9 squares**
Sophmore, Rexanne Trautmann's beautiful progress during remote learning! Well done and careful observation.
